
Saturday, June 26, 2010

"Tweaking" My Bathroom Light

I cannot take credit for this idea - all the credit goes to my niece Amy, who just so happens to have the Design Intervention blog.  If you've seen her blog, you know she is one very talented young lady - if you HAVEN'T seen her blog be sure to check it out!!  She actually helped me come up with a lot of ideas, and has had to answer countless questions from me about whether or not something looked right. 

Anyway, on with the light.  I was in the process of making over my master bedroom and bathroom when Amy was here visiting her Mom.  I asked her to go shopping with me to help me find some things to decorate with - one of which were lights for my bathroom.  Needless to say, Amy jumped at the chance to spend MY money instead of hers, and did a VERY GOOD job of it (spend my money that is!!!!).  We went from place, to place, to place trying to find "just the right" light.  I had already installed a small chandelier over my garden tub, so she was trying to find something that would coordinate with it.  She was looking at details that I had not even paid attention to.  Finally she looked at this one light, and said, "stay with me here, cuz I have a crazy idea."  At that point I already knew it was probably something pretty cool, so I was all ears!  She recommended that I wrap the steel bars with clear crystal pearls.  GENIUS!!!  That little touch would make it match the features of the chandelier beautifully. 

Here is a picture of the chandelier (shown with close-up detail) over my tub.

So this is what I did to create my matching lighting.  These are the lights I bought.  You will see that the "metal portion" is just like that in the chandelier.  Amy also recommended that I purchase different glass/light bulb covers as well to make them match a little better.


Next I purchased a spool of the clear crystal pearls.  I placed a small dot of hot glue at the top of the bar and started wrapping the pearls around the bars.  As I wrapped I continued to use hot glue to secure the pearls and keep them tight on the bar.


I continued wrapping and gluing until all three light bars were wrapped. 


Added the lights covers...


and finally... installed them in the bathroom. 
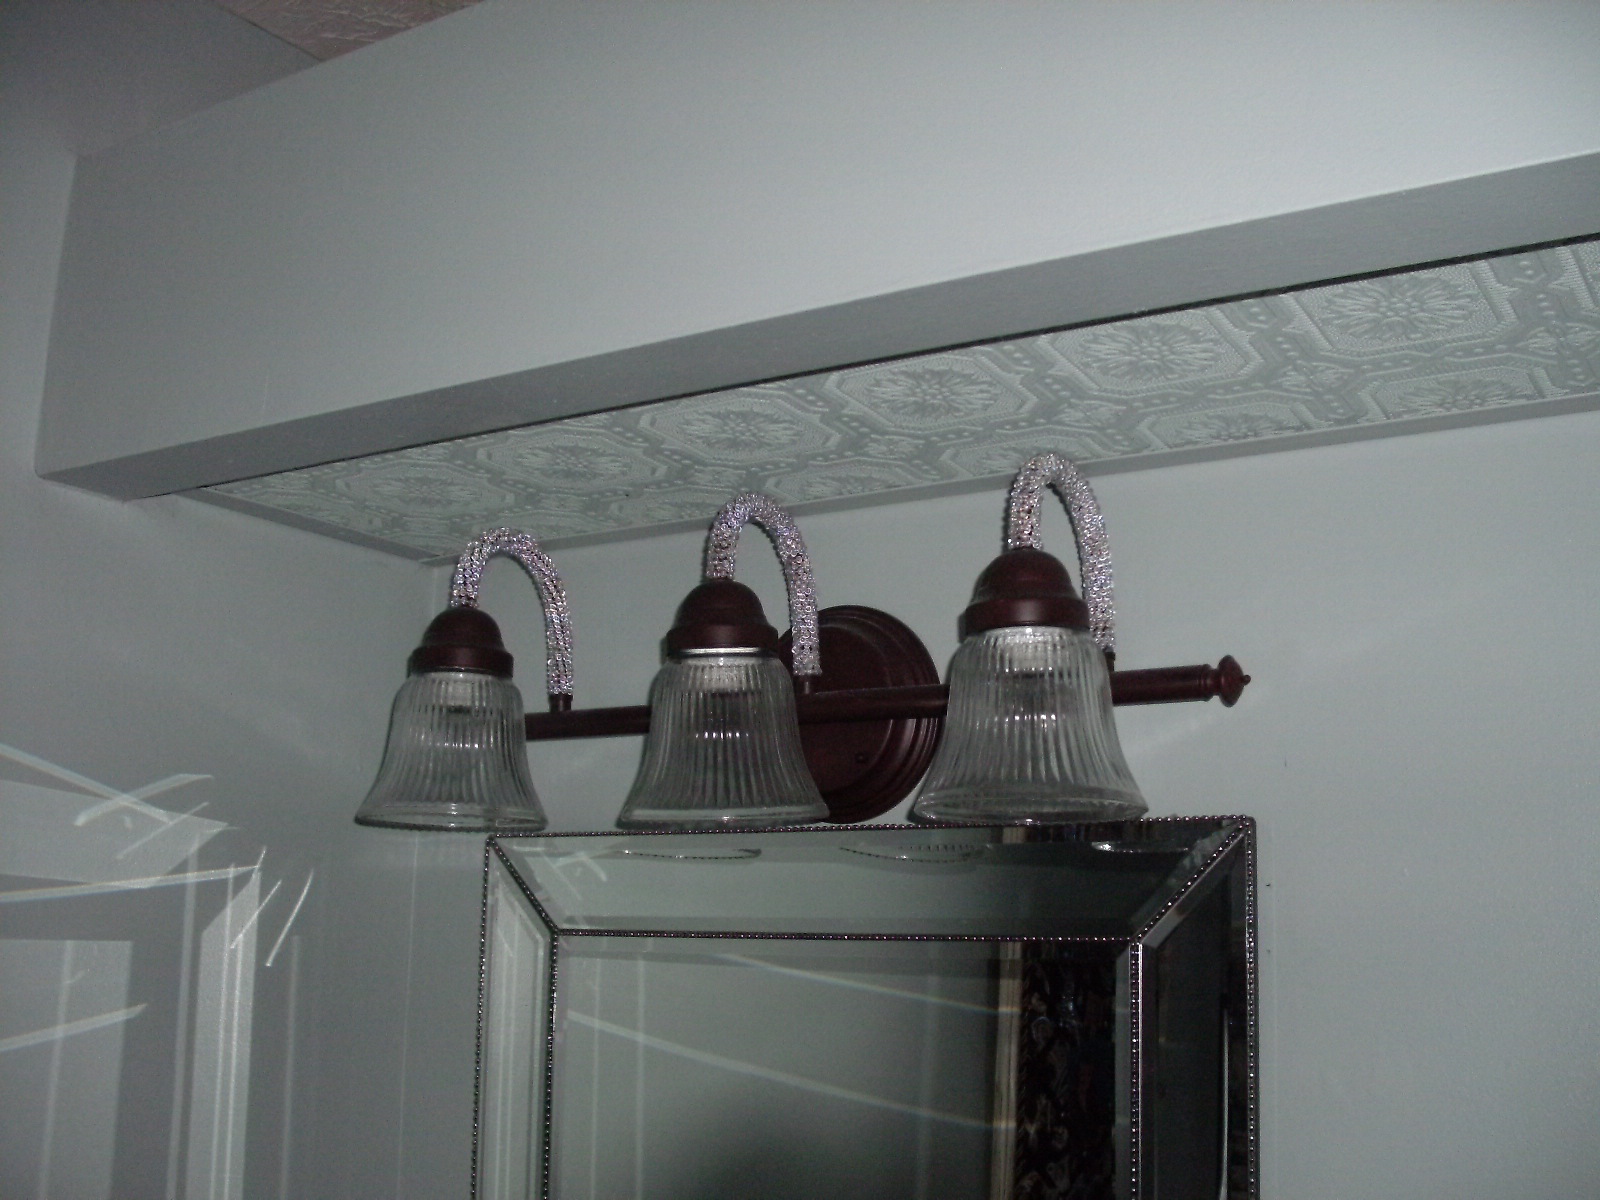

Like I said... GENIUS!!!!  Aren't I lucky to have such a smart little niece?  Thanks Amy, your idea worked out beautifully!!

Vintage Photo Book Covers

Continuing with the "book" theme, I decided to try another quick and cheap technique with a set of books.  I know I saw a similar idea like this on someones blog, so I can't take total credit for this idea - unfortunately I can't remember where I saw it.

Anyway, I have a number of books that I have set aside to use when decorating.  I selected several different sizes of books that I thought would make a nice grouping.  Next I needed to find some old photos.  I wanted to use either black and white or sepia photos.  I eventually want to get some of my own old family photos, but I wanted to see if I even liked it before I went to a lot of work.  So, a-searching I did go (on the Internet that is).  I was able to find a site that had tons of old photos that had decent resolution.  I wanted to find pictures that could "feature" a portion of the photo that would appear on the spine, with the rest of the photo wrapping to the front and the back of the book.  Once I had some pictures I thought I could use, I measured the sizes of the covers and spines.  I do all my graphic design in Corel, so I created a book cover to match the book size and imported the photo.  I carefully placed the photo in the appropriate place on the spine and printed it out on 12 x 18 paper.  I then made a book cover (just like we had to do with old paper bags in school - don't even tell me you're too young to ever have done that!!!!), and wrapped my book with the new photo cover.  It doesn't really matter that the photo does not go all the way to the edges of the book, because all you will see is the spine. 

I LOVE these covers - not necessarily the pictures themselves, but the idea and especially using the muted colors.  I can't wait to find and scan some of our old family photos to use instead of using pictures of people I don't even know.  Keep in mind, the wider the spine of the book, the more you will see of the photo you are using. 


Friday, June 25, 2010

Uncovered Book Bundles

I was recently walking through a mall and went into a store I had never been to (or even heard of) - Restoration Hardware.  What an awesome store!  Unfortunately...Waaaaaay out of my price range, but awesome stuff none the less!  Anyway, as I was wandering through the store, and lusting after many of their items, I came across a very simple item and thought, "Hey!  I could make that!!!"  It was a stack of books that had their covers removed!  Yep!  That's all it was... all for the low, low price of $29.00!!!  YIKES!!!  Would someone really pay that much for 4 old books with their covers ripped off??  In their catalog they are listed as "New - Set of 4 Antiques Uncovered Book Bundles".  Here are a couple of pictures I took with my phone camera (on the sly of course) in the store.
Anyway, it didn't take me very long (like maybe 2 seconds) to figure out that I could make a fairly good reproduction of this lovely item.  I probably have some old books around the house that I could use, but instead I decided to make a quick trip to our local Goodwill store and rip apart some books that I don't care about.  I checked their book selection carefully.  You want to get "older" books, perhaps even a bit "yellowed".  One thing that is important... you need to make sure the cover can be completely removed - especially from the spine, and will leave a "textured" spine.  I was so excited to get started on this (very COMPLICATED) project that I forgot to take pictures of the work in progress, but I think you can probably figure it out all by yourself.  It took me about 5 (very exhausting) minutes to rip apart carefully remove the book covers and tie them up with some twine.  I have some old tags, so I tied one of those on as well and added a stamp on it to finish it off.  

Total cost?  $5 for the books.  Total savings?  $24... not including tax!!!  Whatcha think?

Mine... 


Theirs...

I don't think I did to bad.  PHEW!!!  That was a tough one!!!

Long Time No Post

Geeeeeezzzzz, it has been a LOOOOONG time since I have posted anything, but it couldn't be helped.  (Not that anyone missed my postings since I don't really have a following, but hey, someday people may go back and read these posts!)  I just started back to work after 7 weeks of bed rest.  I was diagnosed with CMV (a cousin to Mono), and was told to go to bed and do NOTHING!!  I wasn't even allowed to be on the computer - that was tough!!  I followed "doctor's orders", and am finally starting to feel a little better.  I hope to start posting some of the things I was working on before I was laid up.  I hope to start working on some of my larger projects real soon, but I know I have to take it fairly easy for a while yet, but I'm itching to get back at it. 

Tuesday, April 20, 2010

Round Window Covering

As I started pondering how I was going to make over our entry powder room, one of the biggest dilemmas was determining what I would do with the window. We have a beautiful round window in that room, but with the bathroom being on the ground floor it obviously has to have some type of covering. The current covering was nice… in its day, but had long since become dated. (Unfortunately I don’t have any “before” pictures.) Originally I had taken a loooong piece of fabric and made a pocket (much like one on a standard curtain) to gather on a rod. The “rod” was a large quilting hoop which was just the right size. I had then gathered it together in the center of the hoop and secured with a rubber band. It looked like a pretty flower in the center – but I was pretty sick of it. So, the question was… “How can I switch it up and give it a whole look?” I needed something new and sleek. I spent days searching the internet, but alas I found no suggestions. Of course I could spend tons of money and “buy” something, but that just wouldn’t do. I determined that I was on my own to try and come up with a new idea. I wanted a window covering that looked like “slats” or a window blind. (The one reason I wanted "slats" is because I DID want to be able to peak through the window covering to see outside if I needed to.  If it had all been one piece I could not do that.)  After one failed less than desirable attempt, I gave it another shot, and this is what I came up with.

First I went and purchased a brand new 24” quilter’s hoop. This was found a JoAnn Fabrics for about $6.00. I used the inside portion of the hoop so I had one solid hoop – reserving the outer hoop for later in the project.


From my first attempt I learned that it was very easy to pull the hoop “out of round”, so I figured I better reinforce it somehow. This was done by taking two strips of fabric – slightly larger than the hoop, and stapling them to the back of the hoop. I measured carefully to make sure that once attached the hoop kept the same dimension all the way around.


Next I purchased a yard of fabric that I wanted to use. On my first go-round I had tried a sheer fabric. That did not really work out, so this time I selected something with a little more body to it.
I determined how wide I wanted my “slats” to be, including the amount for the overlap. I decided that 7” would be just about right. I measured off my fabric every 7” – the cut strips the width of the fabric.


I ironed each strip down the center so I had a nice crisp edge. Since the fabric did not really fray, and I knew I wasn't going to be messing with it much, I decided I did NOT need to finish the edges. (Don'tcha love that kind of a project!!!???)


Although it’s a little hard to see, I laid the strips across the hoop at the approximate distance apart until I had enough strips to cover the hoop.


Once that was done it was time to start assembly. I found the center of my hoop and measured down an equal distance on each side - making sure that my first "slat" would be straight. The first strip is the most difficult because you need to secure it without any puckers. You want it completely flat. I stapled that in place on each side and along the top.


For each remaining piece I measured down the same distance on each side and secured it with a couple of staples. I continued this process until all the pieces were secure. You want to pull each piece taunt without pulling the hoop out of round.

I then took the other part of the hoop assembly. (The one with the screw to tighten it.) I placed that hoop over my hoop with the fabric. I tightened the screw and pulled all the strips to make sure they were tight and straight in the frame. The dilemma came when I realized that I now had a metal screw and plate sticking up - obviously would not fit in the window that way. The solution to that problem was to staple the whole thing together. I went around the outside if the frame and placed staples so it would hold the two hoops together, then it was easy to remove the screw and metal plate.

With that done I was able to cut off the remaining fabric even with the back of the hoop. I tried to make this as neat as possible so it did not look bad on the back side - after all, this would be seen from the outside.
The final step was to hot glue a contrasting cording around the entire edge to finish it off. This way none of the wood hoop shows.

I held my breath as I took it into the bathroom for installation. It was a VERY TIGHT fit, but I was able to get it into the window. I stepped back and admired my handywork. I LOVED it. It was exactly what I had been looking for. It gave just the right look for my newly re-decorated bathroom.


If you have a round window maybe you can think about using this type of covering. Everyone has loved it - I hope you do too!!!


Goodwill Jewels - Project #2

I guess it's time for me to let you know about another one of my "Goodwill Jewels".  I haven't quite gotten down this whole "blogging" thing, so please forgive me if it takes me a while to post.

Anyway, continuing with our outing to local Goodwill stores, my find of the day was this little beauty…


I was in need of a small side chair that I could use in our bedroom. This was the ideal size, had pretty lines to it, was clean, was in PERFECT condition, and was C-H-E-A-P!!!!! Cost for this little baby was only $5.95!!!! Knowing that I already had the fabric at home that I wanted to use, the only thing I needed to purchase was some cording to go around the edge. 

Now, let me put in a little “disclaimer” here… I have NEVER reupholstered anything, but did not feel too intimidated by this particular make-over. My niece Amy (of Design Intervention) had already advised me on how to tackle something like this, so I felt somewhat prepared to dive in.  That is until I tried to find a phillip's head screw driver to remove the seat to start my project.  My husband was out of town, and hard as I tried I could not find even ONE screwdriver!!  I have my own battery-operated screw driver, but my dearest husband had taken the bit for his own electric screwdriver.  NO!  I couldn't even find that one.  Sooooo, before I could even start, I had to make a trip to Lowes for a new bit for my screw driver.  While there I decided in invest in a whole set of screw drivers that would be ALL MINE for future projects.  They will be locked up for safe keeping!


Looking at the underneath side of the chair you can see what good condition it was in.  Only four screws to remove and I was on my way.


I carefully removed the staples holding the black facing (or whatever you call it) and put it aside to reattach later.


At that point I set myself down and started removing what must have been a bazillion staples.  You know all those smart people who tell you to put down a sheet under your work to catch all the staples?  Well, you should listen to them - I didn't, and am STILL finding a staple here and there on my carpet. 

Once I had all the staples removed I ended up with a naked cushion (notice the EXCELLENT condition it is in!).  I laid my new fabric out and used the fabric from the seat cushion as my pattern piece.


Doesn't it look pretty already??


I started questioning my sanity in taking apart this chair when I saw that it was made in Italy.  According to another tag that was on the chair (and subsequent research on the internet) I believe that it is was a pretty expensive chair.

Next step was to lay the cushion/frame down on the wrong side of my new fabric.


I carefully folded over the edges to the underneath side of the seat and started stapling.  I put one staple at the top - pulled the bottom to make it tight, and put in a stapel there to hold it.  I then worked my way around the seat - being especially care with the corners - until the entire seat cushion was secured.


Finally I ran the cording around the seat and secured that with staples as well.


Once that was completed I trimmed away the excess fabric and reattached the black fabric on the back. 

Now I was ready to tackle the chair itself.  With a few coats of Rust-Oleum's Heritage White spray paint....


This lovely red chair -


took on a whole new look!!! 
I love it already!!


After letting it dry for 24 hours, I glazed it and "scuffed it up".  Geeeeezzz - it seems so silly to go to all the work of making sure that I had a perfect paint job, only to scratch it all up.  Why didn't I do this when my kids were little???... then it wouldn't have mattered a bit that my furniture got a scratch or two!!! 

Final step was to reattach the seat to the chair, and bring it to our room.  I was absolutely thrilled with the outcome, and am SOOOOO proud of myself.  I think it turned out pretty darn good for my first try!!


Well, that's it for Project #2.  It was so easy that I now feel qualified to take on an even more difficult project.  I've already purchased another chair at a Thrift Store ($12 - marked down from $15.99), and will start working on it once I determine exactly where I'm going to put it and what fabric I want to use.  Here's a little "sneak peek" of the chair I'll be working on.  Stay tuned for a posting when I take on this little baby!! 


Until the next posting - thanks for visiting.  Feel free to leave me a comment or two so I know there is someone out there reading this stuff!!!  :-)


Friday, April 16, 2010

Quick (and cheap) Porch Makeover

One broken rocking chair – picked up out of trash… $0

One rusty old milk can… $15

One can of Heirloom White spray paint… $3.49
Antiquing over paint (already had)… $0
One yard of fabric for seat… $3.50

One can of Black spray paint… $3.49

Few additional little personal touches…
Total project under $30
New DIY decorations for front porch – PRICELESS!!!!

And you never even notice that the chair is broken!!!

After I originally posted this I decided to add our house number to the milk can.  I need to pay closer attention to where I get these ideas, because I actually found it on another blog site.  I'll try to find it and add it in here so I can give credit where credit is due.  Anyway, here is a picture of the milk can with the addition of our house number.  (Instead of painting the number I borrowed my friend's Cricut cutter on white vinyl - worked GREAT!!! Thanks Michelle!!)