Friday, January 14, 2011

“Blinging Up” My New Chandelier

A couple of weeks before Christmas I was walking through Goodwill and was about ready to walk out.  Out of the corner of my eye I saw something big and shiny sitting on a table.  I glanced over and low-and-behold I saw a beautiful light fixture.  Price?  $19.95!!!!  I can’t believe that I almost walked away because I was afraid my hubby would kill me.  I stood there and debated, then I picked it up.  Oh good heaven’s… that thing was HEAVY.  I was a GOOD fixture and in perfect condition – not even any dust on it!!!  The thing I didn’t really like were the metal shades – which I knew could be removed.  I was beginning to see the potential.  Well, at that point I said, “I don’t care if my hubby rolls his eyes when he sees this or not, I’m gonna get it!”  I’m telling you, that thing was so heavy that I could hardly carry it to the register and then out to my car.  I DID get a slight eye-roll from my hubby, but he also knew we wanted a new light for our dining room, PLUS even he knew it was a GOOD fixture.  This is what it looked like when I brought it in the house… see how it shines?
GEDC2190 GEDC2193 GEDC2189
I just “casually” mentioned to my hubby that maaaaybe we could install it sometime in the near future… hopefully before Christmas???  You know what?  He said, “Well let’s do it!”  Well knock me over with a feather!!  I got the tools together before he could change his mind and quick as a wink we had that baby installed (with a “dimmer” to boot!!!!!).  GEDC2235
Why is it that I don’t see things are crooked/upside down/etc. until I post pictures??  I also forgot to take a “before” picture of the light.  Trust me, it was a very basic CHEAP builder’s quality fixture.GEDC2214 GEDC2235
Now this was quite an improvement, and I was already loving it, but of course – never to be satisfied – I felt it could be improved upon.  I seen so many different people post on how they improved a chandelier.  One in particular that inspired me to try was Diane (http://inmyownstyle.com/2010/11/dining-room-chandelier-make-over.html).  I thought... could I???… should I???…  “bling” it up????  But of course I should!!  Besides, with it being Christmas time I figured I might be able to find some crystal items to use.  I was right.  Not only did I find crystal items, but they were half price!!!  WAHOO!!!!  The beaded garland was a little larger than I wanted, but it would do.  I thought that maybe these crystals might look “cheap”, but they really don’t.  Everyone that has seen it thinks it is beautiful, so I guess price doesn’t really matter.GEDC2288 GEDC2284GEDC2287
I didn’t want to do anything that would be “permanent” or damage the light in any way, plus I didn't want the beads to slide, so I wanted to use some hooks to hang the crystals.  The light itself had perfect areas to hang hooks.  I found some brass ornament hangers at Hobby Lobby which I knew would work perfect (1/2 price!!!).  I cut them and made new hooks out of them.hooks
They work so well that they blend right in with the light.GEDC2315
I figured out how much of a drop I wanted between hooks and started hanging them and then hot-glued the two ends together.  I did this several times in different areas.  I also made some drop crystals to hang down.  crystals GEDC2313 GEDC2310 GEDC2312
The top portion had to have a little different hook, so I worked with them a little more and made a perfect little hook for that as well.
GEDC2311
The only place I had to use glue (hot glue) was on the crystals that dropped from the top portion down to the “candle light-bulb” area (or whatever you call it).
GEDC2316
One final thing and I would be done… the center drop crystal.  I had a beautiful REAL crystal that my boss had given to me a couple of years ago.  I made that into another drop that would hang below everything else.  Oh my gosh… this thing was looking AWESOME!!!!CIMG3821 CIMG3822
I had a bit of a hard time getting good pictures, because the crystal garland wants to reflect so much, but I think you’ll get the general idea.  Between the cost of the light, and all the crystals, I have created a beautiful Chandelier for about $35!!!!
CIMG3819GEDC2303GEDC2300
One more time… here’s the “before”GEDC2235
And here’s the “after”.
GEDC2309
I’m really happy with it!!!  The nice thing is that if I want to change it, get tired of it, or even want to clean it, all I have to do is unhook everything. 

So what do you think?  Do you like the “Before” or the “After” better?????  I really WOULD LOVE to hear what you think!!!

I think I'm going to find a few parties to link up to...

Saturday Is Crafty Day! (Along for the Ride)  /  Saturday Nite Special (Funky Junk)  /  Flaunt It Friday (Chic on Shoestring Decorating)  /  FAB Friday (Frugal & Fabulous Design)  /  Feature Yourself Friday (Fingerprints on the Frig)  /  Frugalicious Friday (Finding Fabulous)  /  Motivate Me Monday (Keeping it Simple)  /  Making the World Cuter Monday  /  The DIY Show Off  /  Metamorphosis Monday (Between Naps on the Porch)  /  Making Monday Marvelous (Creating Really Awesome Free Things)  /  Made By You Monday (Skip to my Lou)   /  Nifty Thrifty Tuesdays (Costal Charm)  /  Mad Skills 

Tuesday, January 11, 2011

Goodbye to my Mother-in-Law

Today's posting is dedicated to my dear Mother-in-Law.  Darlene  Scott (nee Patrick)On Friday, January 7, 2011, Roxie Darlene Scott went home to be with the Lord.  She had been suffering with COPD for about 8 years.  During the last couple of years we have been in the process of that "long goodbye" as she slipped further from us with Alzheimer's. 

She went to the hospital in early December, was there for two weeks, and then on Christmas Eve was transferred to a nursing facility.  The final two weeks there in the nursing home were difficult, so we knew things were beginning to come to an end. 

The family that she left behind... 2 sons (2 daughter-in-laws); 5 grandchildren; and 5 great grandchildren, will truly miss her smiling little face.  She had been a widow since 1984, and especially enjoyed time with her friends and family.

We are so thankful that Mom was a born again Christian and loved the Lord.  We know that as she slipped from her earthly body she was immediately in the presence of the Lord and was rejoicing with friends and family who were awaiting her arrival.

Today is the viewing, and there is a snow storm hitting us right now.  Family and friends are traveling here right now, so we ask for prayer - that they may have traveling mercies.  Also, a number of people - including myself - have the flu right now,  We would appreciate it if you would keep our family in prayer during the next couple of days.


Wednesday, January 5, 2011

Skates Makeover – A Winter Decoration

Early in December I came across a new blog “Forever Decorating”, (well, new to ME anyway) and fell in love with one of her projects.  When I saw her pictures of some skates she had decorated, I knew that was a project I wanted work on right away.  Check out what Terry did with her skates… http://foreverdecorating.blogspot.com/2010/11/its-beginning-to-look-lot-like.html   I had JUST gotten some skates (my daughter found them for me at a thrift shop for $3), so my little brain started rolling.
The first thing I did was to stamp and emboss some snowflakes onto the skates.  (I have fallen in love with embossing lately.!!  It makes something plain into something really special.)  I then added a little bit of “bling” in the center of each snowflake.
CIMG3801
I removed the shoestrings and replaced them with some pretty ribbon and added some shiny silver bells.
CIMG3881
CIMG3883
Of course I NEVER do anything nice and simple.  I decided to add some lights to the skates.  I purchased the real small mini lights, figured out how many little  lights I needed for each skate, as well as enough to go between the two skates, and then hot glued the lights into the skates (hope they don’t burn out any time soon!!).
CIMG3893
CIMG3891
CIMG3892
I cut and added a soft feather boa to the top of each skate – hot gluing it in place.  The final touches included adding another beautiful ribbon to hold the skates together and hang the skates with, some greenery and beautiful red berries. 
CIMG3884
CIMG3889
I then took the skates outside, sprayed the bottom portion with spray adhesive, and sprinkled it with some shimmering glitter to make them look like they had just been brought in from ice skating.
CIMG3901
CIMG3899
The final touch was to add a pretty little white bird – landing on top of the skates.
CIMG3885 
Last thing I needed to do?  Hang them of course (and plug in the lights)!!!
CIMG3894
CIMG3902
 CIMG3887
CIMG3797
Don’tcha just love ‘em??  I think they are so pretty that I’m just going to leave them up as a Winter decoration. 
I would love to hear what you think of this little project.  I found Terry (my inspiration) because she had come to my site and left a comment.  I returned the favor by visiting her blog… so the love just goes on and on!!!  Thanks Terry!!
NOTE:  I loved these skates so much that I decided to make a pair to bring as my "Exchange Gift" for our ladies Sunday School Christmas Party.  Let's just say that they were fought over quite a bit, but once my friend (who LOVES "bling") got hold of them she just "dared" someone to take them from her!!!  It was quite funny.  Anyway, I obviously did not want to give MY pair, so we (actually my hubby did it for me)  started looking on Craigs list and found a pair without any problem at all.  Sooooo, check your local ads to see if you can find a pair.  Good luck!!

I'm gonna go "party" now!!!!
giveaways


Signature

Monday, January 3, 2011

Christmas 2010… Just a memory (and a few... actually a LOT of pictures!)

Well, 2010 ended on a rather difficult and unusual way.  It will be one for the memory books – that’s for sure!!  At the beginning of December I started pulling out all our Christmas decorations, with visions of FINALLY getting all the redecorating done once and for all.  You know how it is, you actually start out by making a BIGGER mess, and it takes forever to figure out what goes where, rearrange everything until it's just perfect, and then clean up all the mess you made. 

Things started out ok – I was able to create my first tablescape, ordered a few gifts online (even started to wrap them with special packaging) and had purchased the supplies to make a bunch of DIY gifts.  Unfortunately, those best-laid plans came to a screeching halt when I received a call from “Lifeline” and was told that my mother-in-law had activated her alarm.  She went into the hospital for the next 2 weeks, then was transferred to a nursing facility.  She has COPD and Alzheimer's, which has been made MUCH worse since she’s been sick.  It proved to be a very rough few weeks… trying to get everything done for company, make the gifts, etc., etc., etc.  I was sick as a dog on Christmas day, and to top it off, my husband and I both got sick on New Years Day, and are still fighting stupid fevers and colds. 

Sooooo, as you can see, there has not been a lot of time for “blogging”.  Shoot – I really wanted to post all the projects that I finished during this whirl-wind month.  So, if you will indulge me, I’m going to go ahead and post those pictures now... better late than never as they say!!  Considering everything that was going on, and how many nights I worked into the weeeeeee hours of the morning, I think everything turned out pretty good.  Perhaps not the way I originally thought, but nice none-the-less.  There are still redecorating projects yet to be completed, but hopefully I can get these completed within the next few months.  Anyway – here we go:

I had posted pictures of my first tablescape, but at that time I didn’t have a tablecloth or my place settings, so I thought I would show the final pictures here.  Added a white tablecloth, two napkins (one white, one black) bound together with some pretty rhinestone napkin rings and my good china.  I don’t usually use my good china in the kitchen, but I wanted the white and silver, so it was exactly what I needed.
CIMG3785

CIMG3776

CIMG3780
Added in our initial with a little more “bling”.
CIMG3786
Moving on to the kitchen, here’s a little vignette and a few other little decorations.
CIMG3759

CIMG3756

CIMG3758
 One of MANY Santa's you will see throughout the house.  Just love having a special little fella all dressed up and ready to help in the kitchen!!!
Santa 1 CIMG3761
A BIG old rusty spoon - picked up at a garage sale for $.50 became a perfect little hanger for my apron. 
CIMG3753
CIMG3754 
CIMG3752
The little bird cage was one of my "Thrifty Finds" some time ago.  It's "Supposed" to be turned over, on the wall as a shelf, but I felt it was perfect to make into a cage and sit flat against the wall.
CIMG3766
Recognize the silverware wall art?  It was just PERFECT for this space.  (Please don't pay any attention to my curtain-less window.  Sill working on that one!
CIMG3767
This is the ledge between my kitchen and dining area.
CIMG3775 CIMG3771 CIMG3772
You know that paper they use at Hobby Lobby or Marshall's to wrap your stuff in?  Well it works perfect to use on various projects.  For this candle I just used a piece, stamped on it, and then put it on the candle along with the ribbon.  Turns a plain candle into a real decoration.
CIMG3773
Didn't do a lot in this area other than sticking a few flowers in this pitcher, along with some antique spoons.
CIMG3774
My sweet hubby helped me make this shelf to go above the ledge.  I actually used MY OWN power saw to cut the wood and mitre the molding around the edge.  I'm getting to be quite handy with the power tools!!
CIMG3747

CIMG3750 
This little Santa sat watch over us on my new shelf.
CIMG3749

CIMG3816
This table separated my eating area from the family room.  In keeping with my new black and white theme that I had going, I just HAD to get this new Santa this year.  When I saw his gray suit I snatched him up quick as a wink and brought him home.
CIMG3733

CIMG3734

CIMG3735

CIMG3736 CIMG3737
I've never even had a chance to share my first hutch makeover, but here is it.  I'll post more about it later, but I absolutely love the way it turned out. 
CIMG3741

CIMG3743
We found the "Garfield" street sign at a flea market.  I was born and lived some of the most memorable years of my life on Garfield.  Sweet memories every time I see it!
CIMG3742

CIMG3746 CIMG3745
Don'tcha just love the little Santa with his striped PJ's to match my candy canes???!!!
CIMG3744
This is a look at my entry way and another couple of pieces of furniture I've redone and never posted about.  I'm not quite done with either of the pieces (obviously since there are no knobs on the chest) shown below, so once they are completed I'll post about them with the before and after pictures. 
   CIMG3791 CIMG3792 CIMG3793 CIMG3795
Even some "goodies" for Santa to snack on!
CIMG3794 
This is the other piece in my entry.  Perfect spot for me to hang the ice skates I decorated.  (Yep... more on the skates later too!)
CIMG3796 CIMG3804 CIMG3797 CIMG3798 CIMG3800
Obviously the chairs are yet to be redone... hey - at least I got them painted!!  I have the fabric, just no time to get them done.  Now my biggest fear is that I've taken them apart and will forget how to put everything back together again. 
  CIMG3818 CIMG3805
This is my beautiful new WHITE couch that I purchased for the living room.  This is NOT a slip cover, so it's pretty much off limits unless you have clean hands, clean pants, and DEFINITELY NOOOOO beverages in hand!!!!  WHOOPS!!!  Didn't realize the Santa pillow was upside-down until I started posting these pictures. 
CIMG3806 CIMG3807 CIMG3808 CIMG3809 
One Santa on the right side of the couch, and another Santa on the left.
CIMG3811 CIMG3812 
Oh, and another sitting atop the hutch in the living room.
CIMG3814
As well as a Santa on the desk...
CIMG3815
Oh, and one more on the piano (yes! I love Santa!!) 


CIMG3846 
Moving into the Dining Room.  I absolutely love, Love, LOVE the pale yellow and white that we just recently redid.  I used cream, gold, and blue accents.
CIMG3845 CIMG3823  CIMG3825  CIMG3827 CIMG3828 CIMG3829
My Mom thought it was funny that I put a snowman in my birdcage.  I told her it was "climate controlled"!!  LOL
CIMG3830  CIMG3832 CIMG3833  CIMG3835  CIMG3837
This is my husband's beloved High Wheel bike (yes, he DOES ride it!!).  Not sure if this will be it's final "resting place" or not.  It's kind of hard to find the right place for something this large!!!
CIMG3838  CIMG3840 CIMG3841 CIMG3842 CIMG3844 GEDC2276 
The centerpiece in the Dining Room had some special elements... old family photos.
I made these small family photo frames a number of years ago (sometime I'll have to explain how I made them).  Everyone sitting at the table enjoyed looking at the pictures and trying to figure out who was who.
CIMG3855 CIMG3856
GEDC2257

GEDC2258

CIMG3857
I used a few photos on the buffet as well.
CIMG3858
Of course there was another Santa!  LOVE his cream and gold outfit!
CIMG3859
Clock was a thrifty find, as was the bugle that holds a silver and gold ornament.
CIMG3860 CIMG3861 CIMG3862 CIMG3864 CIMG3874 CIMG3875  GEDC2237 
WHAT???  No Santa sitting atop my china cabinet???  Nope - used my beautiful angel for this one. 
GEDC2240
 GEDC2245  
I added in a few sprigs of greenery to finalize the decorations on the napkins.  Oh, there there are the individual parfaits that I made for each person. 
Oh, I just have to show you my pretty glassware.  Isn't it beautiful??!!!  I have eight place settings of 7 different sizes.  Cost me a pretty penny???  NOPE!  Not ONE CENT!!!  It was a curbside find - thanks to my sweetie-pie hubby!!!!  Yep, he's on the lookout for great finds too!!!!
Before we leave the dining room, I have to show you what I'm doing with the chairs.  I'm in the process of redoing them, but due to unforeseen circumstances have only completed two.  I'm going from this...
GEDC2252
to this!!!!  I'm looking forward to getting them all done.
GEDC2253       
Finally, into the Family Room.  I would have liked to purchase all new stuff for the tree - to match my new style and color of decorating, but no $$$ for that, so it's the same old stuff as I have used.  I think that it still looked fine.
These pictures were taken AFTER Christmas, so presents had already been opened.


 This table has not been done yet, but hopefully I can get to it soon.
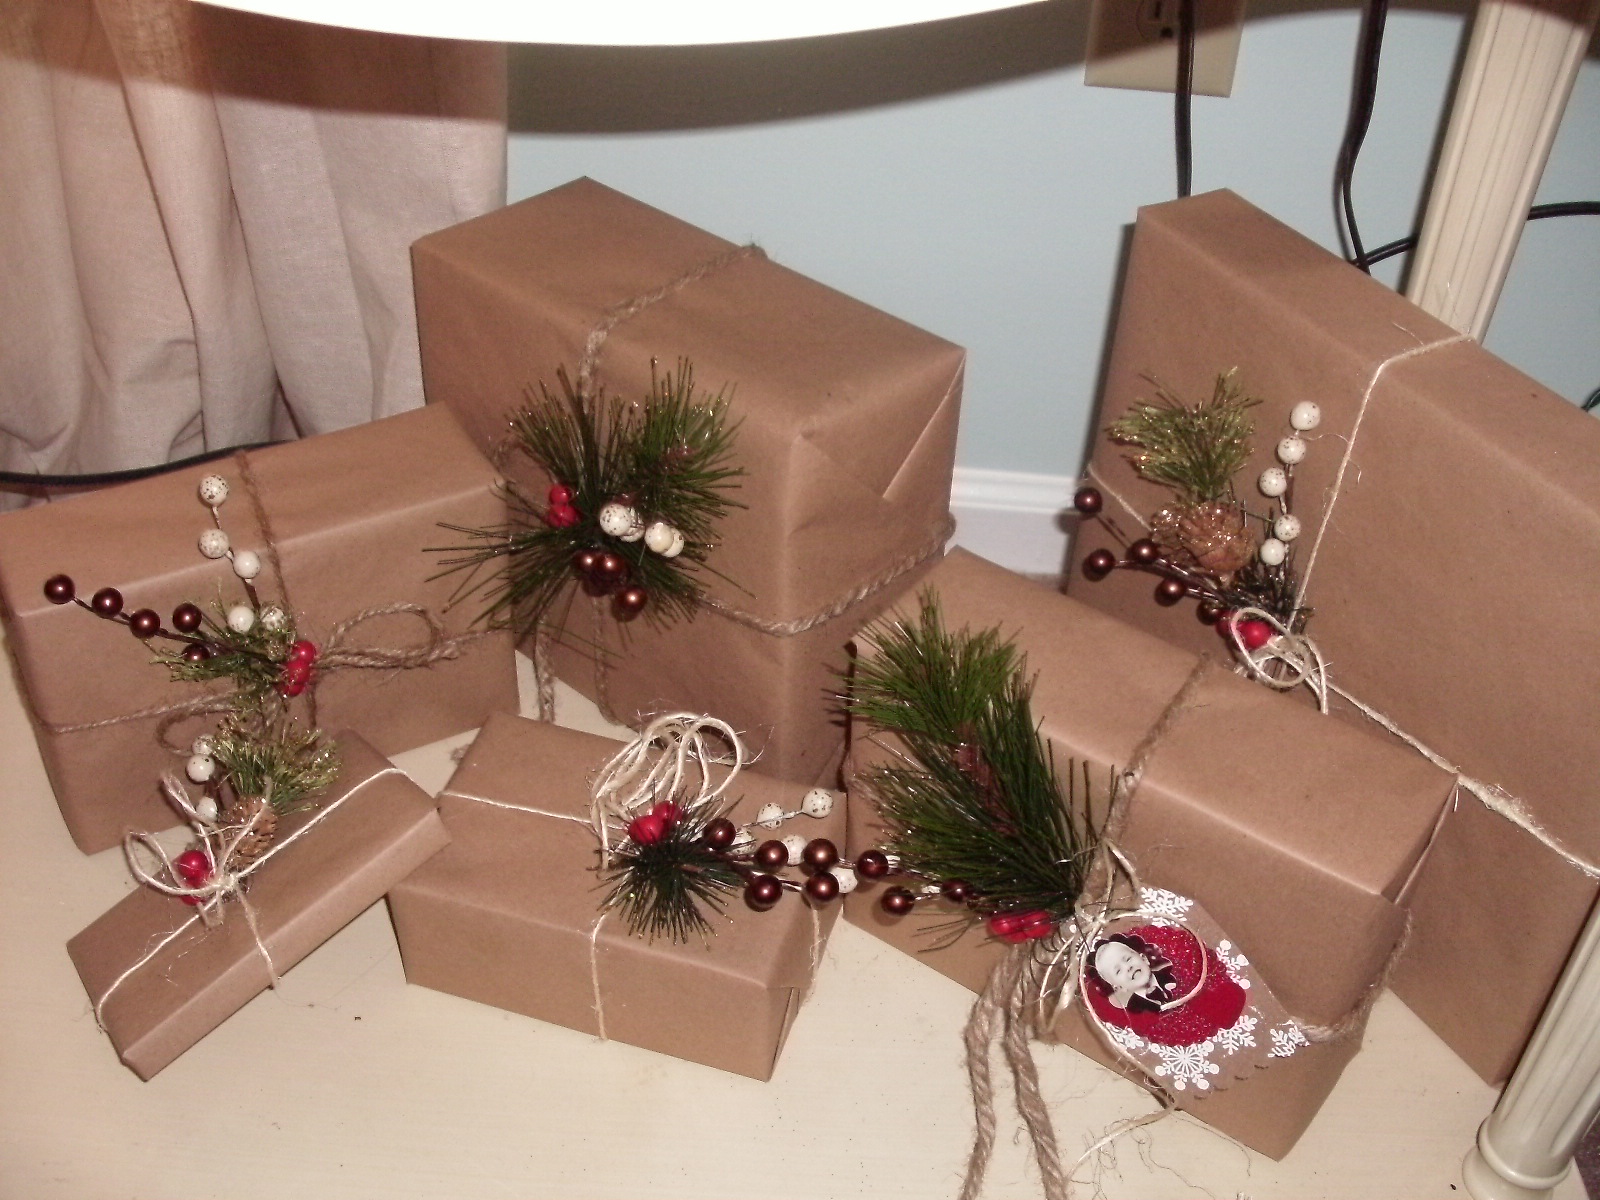
This is what ALL my packages were SUPPOSED to look like.  Yeah... that didn't happen.  Because of sickness and everything else going on, my hubby finished wrapping all the gifts.  It's safe to assume that they looked NOTHING like this!!!!

 I was making gift tags for each package with photos of the recipient... most of the pictures were from the past.  I made them not only as gifts tags, but so they could be kept and used as ornaments.

  
Well, that's it folks... that should have kept you occupied for some time.  I've found that it's a lot harder to catch up on posting than trying to keep up every few days.  PHEW!!!!  I have a lot of projects that I need to break down by showing the "before" and "after" pictures.  HOPEFULLY I'll get to those real soon.

I hope that all of you had a wonderful Christmas and pray that you will have a BLESSED 2011!!!!!

I would LOVE to hear what you think about all the decorating I did.  Geeeezzzz, it seems like I JUST put them up (which I did), and now I have to take it all back down.  :-(  So sad!!!!

I'm going to link up with a few parties to "strut my stuff"!!
  Get Your Craft On Tuesday  The Best Part Of Believe     


Signature